In this part of the tutorial, we will use the SPX move in 1987, the massive top, and the crash as an example. But also the big run-up into the events that took place over the summer and autumn. It is close to the perfect top setup, very neatly caught by the DeMark indicators, and a good way to learn the basics of the most known part of the indicators, the Sequential 13 Countdown.
There is no difference between a move Up or Down in DeMark. The counts are exactly the same both ways.
A potential trend begins with a Price flip. This a close (for a move higher) is higher than the close 4 bars ago. This is called Priceflip and produces a blue “1” on the chart.
To then have a meaningful move the market has to see 8 more consecutive closes higher than the bar 4 bars ago meaning for example the 9th bar must close above the bar marked “5”. Then you have a Sellsetup (the opposite for a move down) marked by 1-9, often called a “9”.
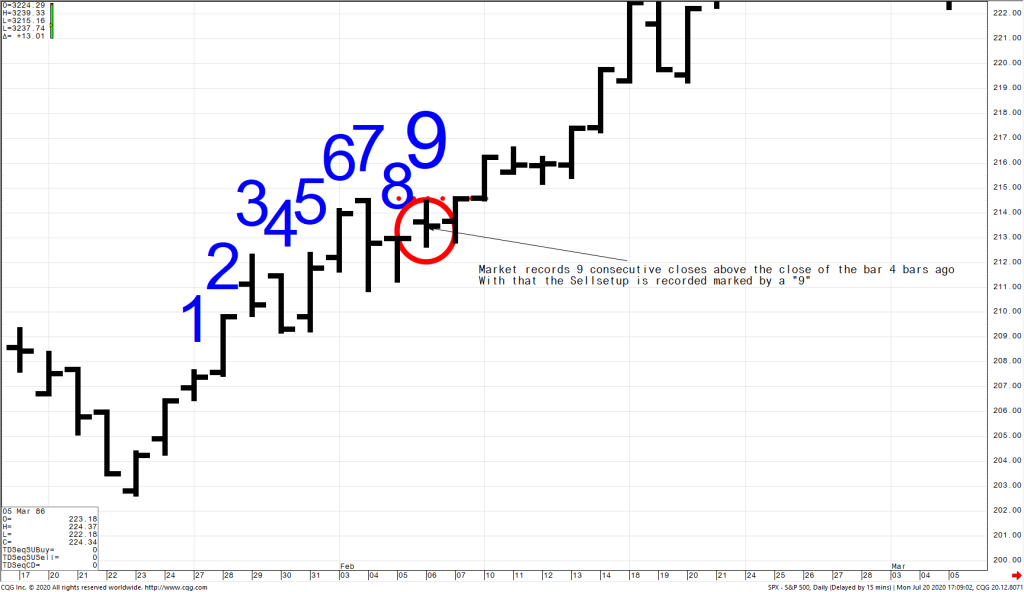
This Sellsetup is only the name and not something to go and just sell. Instead, a 1-4 bar reaction is sought. As in the case above, it moves lower for a bar but this Setup is not what is called “Perfected”.
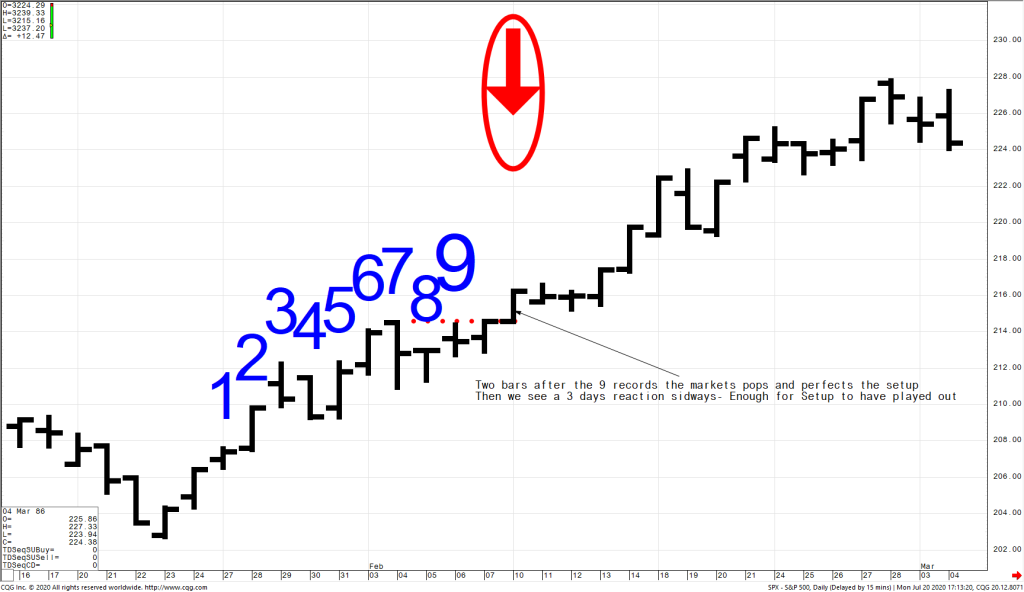
Perfection means that the high of bar 8 OR 9 is higher than the high of bar 6 OR 7. If it is not the market has a good probability of coming back above to fulfill this requirement.
In this case, the 9 makes a small reaction lower and then makes a new high.
Following the completion of a setup, one of the most important levels is created at the low of bar 1 (the high for a Buy setup), the TDST. This level is now considered support and a move into it from the Sellsetup is bought until a qualified break of it.

To identify a potential trend in a market we must identify the beginning of a trend. A possible trend is identified by a Price flip that could lead to a DeMark Buy – or Sellsetup. This Price flip is for a move higher a close above the close 4 bars ago. If this happens a 1 appears on the chart or Demark chart or map.
The TDST support or resistance is then used to determine if the market is trending or in a range. As long as the TDST contains the contrary move it is considered rangebound and the TDST range is used. As shown in the chart there are multiple tests of TDSTs created in this range.
There is no difference if there is a new TDST or not but there can only be ONE TDST support and ONE TDST resistance. The previous one matters no more when a new Setup is created. A rangebound market can therefore climb higher or lower with every new setup.
Note in the chart that most Setups that record either way with a great distance from the TDST usually come to close the gap and test it. Therefore it is a much better probability to act on a Setup when it is close to or has recently tested a TDST.

As seen at the right end of the chart above, the TDST break early in the Setup (here on bar 1) represents a move into a new trend. When a Setup is recorded the trend indicator starts to count, the Sequential 13.
The count starts on the 9th bar and each of the 13 bars needs to have a close above the high two bars ago. They don’t have to be consecutive but can be anywhere unless there is an opposite count. In the case of an upside Sequential 13, a Buysetup bar 9 lower cancels the count to 13 and it disappears.
Instead, the market then is back to rangebound as long as above the previous TDST support from the Sellsetup OR a Buy Sequential 13 count begins with a lower close than the close 2 bars ago. Again, there can only be one TDST either way and only one active Setup and Countdown. The second Setup the opposite way is recorded the previous unfinished count is canceled.

The chart above shows the recording of Sequential 13 where bars are not consecutive and the only other condition is that the close of bar 8 is above the close of bar 5 and that the high of the 13th bar is above the close of bar 8.
The expectation of the countdown is a meaningful reaction within 12 bars or a stop if a break above the Risk level (line above the 13) occurs. If a break is seen or there is no reaction, the market is not ready to top out. Instead, the Risk level break signals tell of a continuation of the trend. In the case above, the market pauses and corrects sideways before the next level higher starts.
The top of 1987 that follows was perfect. A Sequential 13 that reacts into a Buysetup – the minimum expectation that holds TDST perfectly.
Following this is a bounce into a Sellsetup wildly expected to hold but a qualified break of the new TDST (at the same level more or less) then led to the crash.

This concludes the basic tutorial of the DeMark Setup and Sequential 13 countdown. The other countdown is the Combo which is more aggressive and requires less time as the count starts on bar 1 of the Setup.
In this part of the tutorial, we will use the SPX move in 1987, the massive top, and the crash as an example. But also the big run-up into the events that took place over the summer and autumn. It is close to the perfect top setup, very neatly caught by the DeMark indicators, and a good way to learn the basics of the most known part of the indicators, the Sequential 13 Countdown.
There is no difference between a move Up – or Down in DeMark. The counts are exactly the same both ways.
A potential trend begins with a Price flip. This a close (for a move higher) is higher than the close 4 bars ago. This is called Priceflip and produces a blue “1” on the chart.
To then have a meaningful move the market has to see 8 more consecutive closes higher than the bar 4 bars ago meaning for example the 9th bar must close above the bar marked “5”. Then you have a Sellsetup (the opposite for a move down) marked by 1-9, often called a “9”.
This Sellsetup is only the name and not something to go and just sell. Instead, a 1-4 bar reaction is sought. As in the case above, it moves lower for a bar but this Setup is not what is called “Perfected”.
Perfection means that the high of bar 8 OR 9 is higher than the high of bar 6 OR 7. If it is not the market has a good probability of coming back above to fulfill this requirement.
In this case, the 9 makes a small reaction lower and then makes a new high.
Following the completion of a setup, one of the most important levels is created at the low of bar 1 (the high for a Buy setup), the TDST. This level is now considered support and a move into it from the Sellsetup is bought until a qualified break of it.
To identify a potential trend in a market we must identify the beginning of a trend. A possible trend is identified by a Price flip that could lead to a DeMark Buy – or Sellsetup. This Price flip is for a move higher a close above the close 4 bars ago. If this happens a 1 appears on the chart.
The TDST support or resistance is then used to determine if the market is trending or in a range. As long as the TDST contains the contrary move it is considered rangebound and the TDST range is used. As shown in the chart there are multiple tests of TDSTs created in this range.
There is no difference if there is a new TDST or not but there can only be ONE TDST support and ONE TDST resistance. The previous one matters no more when a new Setup is created. A rangebound market can therefore climb higher or lower with every new setup.
Note in the chart that most Setups that record either way with a great distance from the TDST usually come to close the gap and test it. Therefore it is a much better probability to act on a Setup when it is close to or has recently tested a TDST.
As seen at the right end of the chart above, the TDST break early in the Setup (here on bar 1) represents a move into a new trend. When a Setup is recorded the trend indicator starts to count, the Sequential 13.
The count starts on the 9th bar and each of the 13 bars needs to have a close above the high two bars ago. They don’t have to be consecutive but can be anywhere unless there is an opposite count. In the case of an upside Sequential 13, a Buysetup bar 9 lower cancels the count to 13 and it disappears.
Instead, the market then is back to rangebound as long as above the previous TDST support from the Sellsetup OR a Buy Sequential 13 count begins with a lower close than the close 2 bars ago. Again, there can only be one TDST either way and only one active Setup and Countdown. The second Setup the opposite way is recorded the previous unfinished count is canceled.
The chart above shows the recording of Sequential 13 where bars are not consecutive and the only other condition is that the close of bar 8 is above the close of bar 5 and that the high of the 13th bar is above the close of bar 8.
The expectation of the countdown is a meaningful reaction within 12 bars or a stop if a break above the Risk level (line above the 13) occurs. If a break is seen or there is no reaction, the market is not ready to top out. Instead, the Risk level break signals tell of a continuation of the trend. In the case above, the market pauses and corrects sideways before the next level higher starts.
The top of 1987 that follows was perfect. A Sequential 13 that reacts into a Buysetup – the minimum expectation that holds TDST perfectly.
Following this is a bounce into a Sellsetup wildly expected to hold but a qualified break of the new TDST (at the same level more or less) then led to the crash.
This concludes the basic tutorial of the DeMark Setup and Sequential 13 countdown. The other countdown is the Combo which is more aggressive and requires less time as the count starts on bar 1 of the Setup.
The most widely known DeMark indicator is the 13 count, the Sequential 13 which is trying to identify points of exhaustion. This is what is seen on TV when people try to identify a high or a low. However, this is only a small portion of the work required to identify such points.
In this part of the tutorial, we will use the SPX move in 1987, the massive top, and the crash as an example. But also the big run-up into the events that took place over the summer and autumn. It is close to the perfect top setup, very neatly caught by the DeMark indicators, and a good way to learn the basics of the most known part of the indicators, the Sequential 13 Countdown.
There is no difference between a move Up – or Down in DeMark. The counts are exactly the same both ways.
A potential trend begins with a Price flip. This a close (for a move higher) is higher than the close 4 bars ago. This is called Priceflip and produces a blue “1” on the chart.
To then have a meaningful move the market has to see 8 more consecutive closes higher than the bar 4 bars ago meaning for example the 9th bar must close above the bar marked “5”. Then you have a Sellsetup (the opposite for a move down) marked by 1-9, often called a “9”.
This Sellsetup is only the name and not something to go and just sell. Instead, a 1-4 bar reaction is sought. As in the case above, it moves lower for a bar but this Setup is not what is called “Perfected”.
Perfection means that the high of bar 8 OR 9 is higher than the high of bar 6 OR 7. If it is not the market has a good probability of coming back above to fulfill this requirement.
In this case, the 9 makes a small reaction lower and then makes a new high.
Following the completion of a setup, one of the most important levels is created at the low of bar 1 (the high for a Buy setup), the TDST. This level is now considered support and a move into it from the Sellsetup is bought until a qualified break of it.
To identify a potential trend in a market we must identify the beginning of a trend. A possible trend is identified by a Price flip that could lead to a DeMark Buy – or Sellsetup. This Price flip is for a move higher a close above the close 4 bars ago. If this happens a 1 appears on the chart.
The TDST support or resistance is then used to determine if the market is trending or in a range. As long as the TDST contains the contrary move it is considered rangebound and the TDST range is used. As shown in the chart there are multiple tests of TDSTs created in this range.
There is no difference if there is a new TDST or not but there can only be ONE TDST support and ONE TDST resistance. The previous one matters no more when a new Setup is created. A rangebound market can therefore climb higher or lower with every new setup.
Note in the chart that most Setups that record either way with a great distance from the TDST usually come to close the gap and test it. Therefore it is a much better probability to act on a Setup when it is close to or has recently tested a TDST.
As seen at the right end of the chart above, the TDST break early in the Setup (here on bar 1) represents a move into a new trend. When a Setup is recorded the trend indicator starts to count, the Sequential 13.
The count starts on the 9th bar and each of the 13 bars needs to have a close above the high two bars ago. They don’t have to be consecutive but can be anywhere unless there is an opposite count. In the case of an upside Sequential 13, a Buysetup bar 9 lower cancels the count to 13 and it disappears.
Instead, the market then is back to rangebound as long as above the previous TDST support from the Sellsetup OR a Buy Sequential 13 count begins with a lower close than the close 2 bars ago. Again, there can only be one TDST either way and only one active Setup and Countdown. The second Setup the opposite way is recorded the previous unfinished count is canceled.
The chart above shows the recording of Sequential 13 where bars are not consecutive and the only other condition is that the close of bar 8 is above the close of bar 5 and that the high of the 13th bar is above the close of bar 8.
The expectation of the countdown is a meaningful reaction within 12 bars or a stop if a break above the Risk level (line above the 13) occurs. If a break is seen or there is no reaction, the market is not ready to top out. Instead, the Risk level break signals tell of a continuation of the trend. In the case above, the market pauses and corrects sideways before the next level higher starts.
The top of 1987 that follows was perfect. A Sequential 13 that reacts into a Buysetup – the minimum expectation that holds TDST perfectly.
Following this is a bounce into a Sellsetup wildly expected to hold but a qualified break of the new TDST (at the same level more or less) then led to the crash.
This concludes the basic tutorial, nrexplained, of the DeMark Setup and Sequential 13 countdown. The other countdown is the Combo which is more aggressive and requires less time as the count starts on bar 1 of the Setup.